
Introduction: Safeguarding Your Investment During Assembly
Assembling a floor lamp might seem straightforward, but proper technique is essential to prevent damage to your new lighting fixture. Premium floor lamps represent a significant investment in your home’s aesthetic and functionality, making it crucial to handle each component with appropriate care during assembly.
Did you know that approximately 65% of damage to floor lamps occurs during assembly rather than shipping? This statistic highlights why taking your time with proper assembly techniques matters. Common issues include scratched finishes, cross-threaded connections, cracked shades, and bent poles – all preventable problems with the right approach.
Floor lamps, particularly high-quality designs like arc lamps, combine both aesthetic appeal and functional purpose. Choosing the perfect arc floor lamp involves considering various elements that affect assembly difficulty, so understanding proper handling techniques becomes even more important.
In this comprehensive guide, we’ll walk through:
- Essential preparation steps to ensure safe assembly
- Critical techniques for handling different lamp components
- Specialized approaches for delicate parts
- Testing and troubleshooting methods
- Post-assembly care for long-term protection
Let’s begin with the crucial first step: preparation.
Essential Pre-Assembly Preparations to Prevent Damage
Selecting the Ideal Assembly Space
Creating the right environment for lamp assembly significantly reduces the risk of damage. Select a clean, well-lit area with enough space to lay out all components without crowding. Aim for at least 6 feet by 6 feet (1.8 m by 1.8 m) of clear space.
Protection for your floor lamp components is equally important:
– Lay down a soft blanket, towel, or clean carpet to prevent scratches
– Ensure the surface is flat and stable
– Remove any potential hazards like sharp objects or items that could fall
– Choose a space away from high-traffic areas where people or pets might bump into parts
Working at a comfortable height prevents you from dropping components or applying awkward pressure. A clean table covered with a soft cloth often works well, though larger lamps may require floor assembly. Having the proper essential tools for arc lamp assembly readily available will make the process smoother and less likely to result in damage.
Carefully Unpacking and Inspecting Components
The unpacking process presents the first opportunity for damage if not done carefully. Follow these steps to ensure safe unpacking:
- Place the box on a flat surface before opening
- Avoid using sharp tools like box cutters or scissors near lamp components
- Open from the top and remove any securing tape fully before attempting to extract parts
- Lift components vertically out of packaging rather than dragging them
- Remove protective wrapping by unwinding rather than cutting
As you unpack, inspect each piece thoroughly for any pre-existing damage. Look for scratches, cracks, dents, or loose connections. Understanding the perfect arc floor lamp guide principles can help you identify what should be expected in terms of quality and construction.
Warning: Keep all packaging materials until assembly is complete and you’ve verified the lamp works correctly. If you need to return or exchange parts, original packaging will be required.
Organizing Components and Tools Before Starting
Properly organizing your workspace prevents confusion, lost parts, and potential damage from searching through piles of components.
Before beginning assembly:
– Lay out all components in logical groups (base parts, poles, electrical components, shade elements)
– Check all pieces against the inventory list in the manual
– Sort hardware by size and type
– Keep small parts in shallow containers to prevent rolling away
– Have necessary tools ready:
– Screwdrivers (usually Phillips and flathead)
– Soft cloth or gloves for handling finished surfaces
– Adjustable wrench (if mentioned in instructions)
– Flashlight for checking internal connections
Taking time to stabilize floor lamp base components before beginning assembly will save you frustration later and prevent potential damage from an unstable structure.
Critical Assembly Techniques for Different Lamp Components
Proper Base and Pole Connection Methods
The base-to-pole connection forms the foundation of your lamp’s stability. Proper technique here prevents wobbly lamps and thread damage.
Follow these steps for proper threaded connections:
1. Inspect threads on both the base and pole for debris or damage
2. Align the pole perfectly perpendicular to the base
3. Use the “counter-clockwise first” technique: Gently turn the pole counter-clockwise until you feel a slight click, indicating threads are properly aligned
4. Once aligned, slowly turn clockwise to engage threads
5. Hand-tighten only until resistance is felt
6. Use tools for final tightening only if specified in instructions
Marble base arc floor lamps require extra care during this step, as the weight distribution between the heavy base and the extending arc must be properly balanced to prevent tipping.
Warning signs of improper connection include:
– Resistance when turning (don’t force it)
– Visible gaps between components
– Wobbling or leaning after assembly
– Visible cross-threading (diagonal threads)
Safe Management of Pole Sections and Extensions
Many floor lamps, especially taller models, feature multiple pole sections that must be connected. These sections are often thin-walled and can dent or bend if mishandled.
For safe pole assembly:
1. Support both sections during connection to prevent bending
2. Align sections perfectly before attempting to join them
3. Turn gently without applying sideways pressure
4. Test stability after connecting each section before adding more weight
5. For telescoping or adjustable sections, learn the proper adjustment mechanisms rather than forcing movement
Adjustable arc floor lamps have specially designed mechanisms for height and angle adjustments. Forcing these mechanisms can damage internal components, so always refer to the specific instructions for your model.
Electrical Component Handling to Prevent Wire Damage
Electrical components require special attention to prevent damage that could create safety hazards.
Key safety points for handling electrical components:
– Never pull wires to feed them through poles; instead, gently guide them
– Maintain appropriate slack in wires to prevent tension at connection points
– Avoid pinching wires between threaded connections
– Never force plugs or connectors together
– Check wire routing before final tightening to prevent pinching
– Handle sockets with care, avoiding pressure on connection points
LED arc floor lamps often have more complex wiring for their advanced lighting features. These components typically require extra attention to ensure proper connections without damage.
Attaching Lamp Heads and Socket Assemblies Safely
Lamp heads and socket assemblies connect the electrical components to the mechanical structure and must be handled carefully:
- Support the weight of the head while making connections
- Ensure all wires are properly positioned before tightening
- Check that electrical connections are fully seated but not overstressed
- Tighten fasteners evenly in a cross-pattern if multiple screws are present
- Test the mechanical connection by gently wiggling before adding the shade
Understanding what to look for in arc floor lamps helps identify quality components that are more resistant to damage during assembly and regular use.
Specialized Techniques for Delicate Components
Proper Handling of Glass, Fabric, and Crystal Lamp Shades
Lamp shades are often the most delicate components and require special handling techniques:
For glass shades:
– Always use both hands, supporting from underneath
– Wear clean, lint-free gloves to prevent fingerprints and improve grip
– Never grip by thin edges or decorative elements
– Test the fit before final installation to avoid forcing connections
For fabric shades:
– Handle by the metal frame rather than the fabric when possible
– Avoid pressing against the fabric with fingers
– Install attachment hardware evenly to prevent warping
For crystal elements:
– Handle each piece individually
– Place on soft surfaces when not actively installing
– Check alignment before tightening to avoid stress points
Three-light arc floor lamps often incorporate multiple delicate shades, requiring extra attention to ensure each is installed without damaging the others.
Installing Decorative Elements and Finials Without Scratches
Decorative elements add the finishing touch to your lamp but can be easily damaged if mishandled:
- Align threads carefully before turning finials
- Use finger-tightening only for most decorative elements
- Place soft cloth between metal tools and finished surfaces if tools are required
- Test fit before final installation to ensure proper alignment
- For chain elements, untwist fully before installation to prevent tangling
Rattan arc floor lamps feature natural material elements that require gentle handling to prevent splitting or fraying during assembly.
Safe Light Bulb Installation and Replacement
Proper bulb installation prevents both lamp damage and potential hazards:
- Verify the correct bulb type and wattage before installation
- Handle bulbs by the base, not the glass
- Align bulb threads carefully with socket
- Turn gently until resistance is felt, then only 1/4 turn more
- For specialty bulbs (dimmable, smart bulbs), review specific handling instructions
Understanding the arc lamp features buying guide helps ensure you select compatible bulbs that won’t stress the lamp’s electrical components.


Adjustable Arc Floor Lamp, Bronze Arc Floor Lamp
Price range: $440.95 through $558.52 Select options This product has multiple variants. The options may be chosen on the product page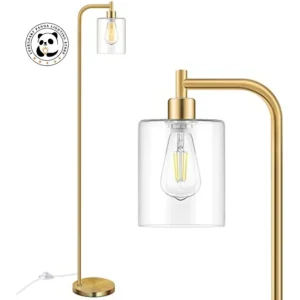

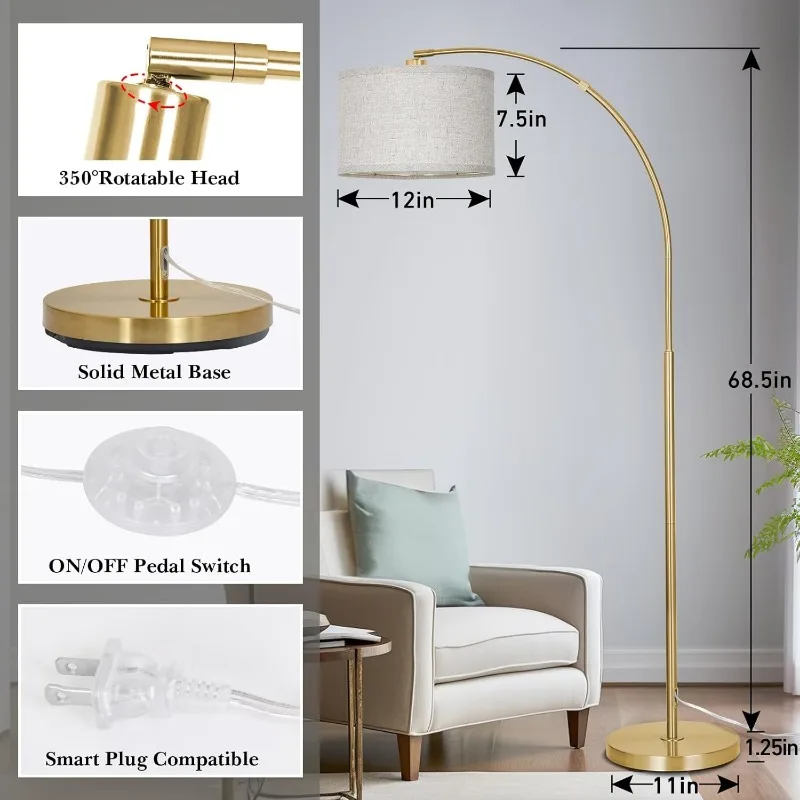
Brass Arc Floor Lamp, Contemporary Arc Floor Lamp, LED Arc Floor Lamp
Price range: $490.72 through $522.04 Select options This product has multiple variants. The options may be chosen on the product page

Chrome Arc Floor Lamp, LED Arc Floor Lamp
Price range: $304.95 through $1,210.40 Select options This product has multiple variants. The options may be chosen on the product page

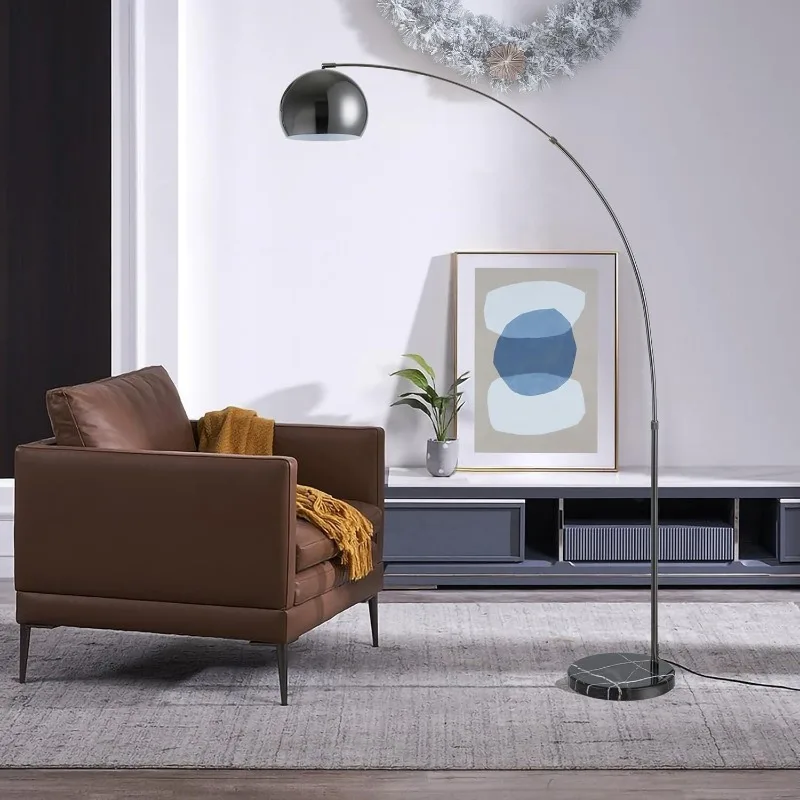
Contemporary Arc Floor Lamp, Large Arc Floor Lamp, Marble Base Arc Floor Lamp
$224.94 Select options This product has multiple variants. The options may be chosen on the product page
LED Arc Floor Lamp, Rattan Arc Floor Lamp
$313.58 Select options This product has multiple variants. The options may be chosen on the product page
 $1,003.85 Select options This product has multiple variants. The options may be chosen on the product page
Testing and Troubleshooting Without Causing Damage
Assessing and Correcting Stability Issues Safely
A properly assembled floor lamp should stand straight and stable. To test stability without risking damage:
- Place the lamp on a level surface
- Check that the lamp stands perfectly vertical (use a smartphone level app if needed)
- Gently press from different directions at mid-height to test wobble
- If wobbling occurs, check that all connections are properly tightened
- For persistent issues, disassemble connections and check for proper alignment
Many easy to assemble arc floor lamps include leveling feet or other adjustment mechanisms that can correct minor stability issues without disassembly.

Resolving Common Assembly Problems Without Force
When assembly issues arise, patience is your best tool. Common problems and their gentle solutions include:
Problem: Parts don’t seem to fit together
Solution: Double-check the assembly guide to confirm you have the correct parts. Reexamine alignment before attempting connection.
Problem: Threaded components won’t engage
Solution: Try the counter-clockwise technique to find the starting point of threads, then slowly turn clockwise.
Problem: Lamp seems unbalanced
Solution: Check that all pole sections are fully seated and tightened. Review base assembly for missed components.
Problem: Components seem slightly misaligned
Solution: Partially loosen connections and realign before retightening in the correct sequence.
Learning how to secure tall floor lamps provides additional techniques for addressing stability issues that might appear after assembly.
Safe Electrical Testing and Troubleshooting
Testing your lamp’s electrical function requires care to prevent damage to components:
- Ensure all assembly steps are complete before plugging in
- Test in a location where the lamp won’t fall if it moves
- Use a surge protector for initial testing
- Turn on any switches slowly, listening for unusual sounds
- For dimmers, test through full range of motion slowly
For troubleshooting electrical issues:
– Check that all visible connections are secure
– Verify bulbs are correctly installed and functional
– Test the lamp in different outlets to rule out circuit problems
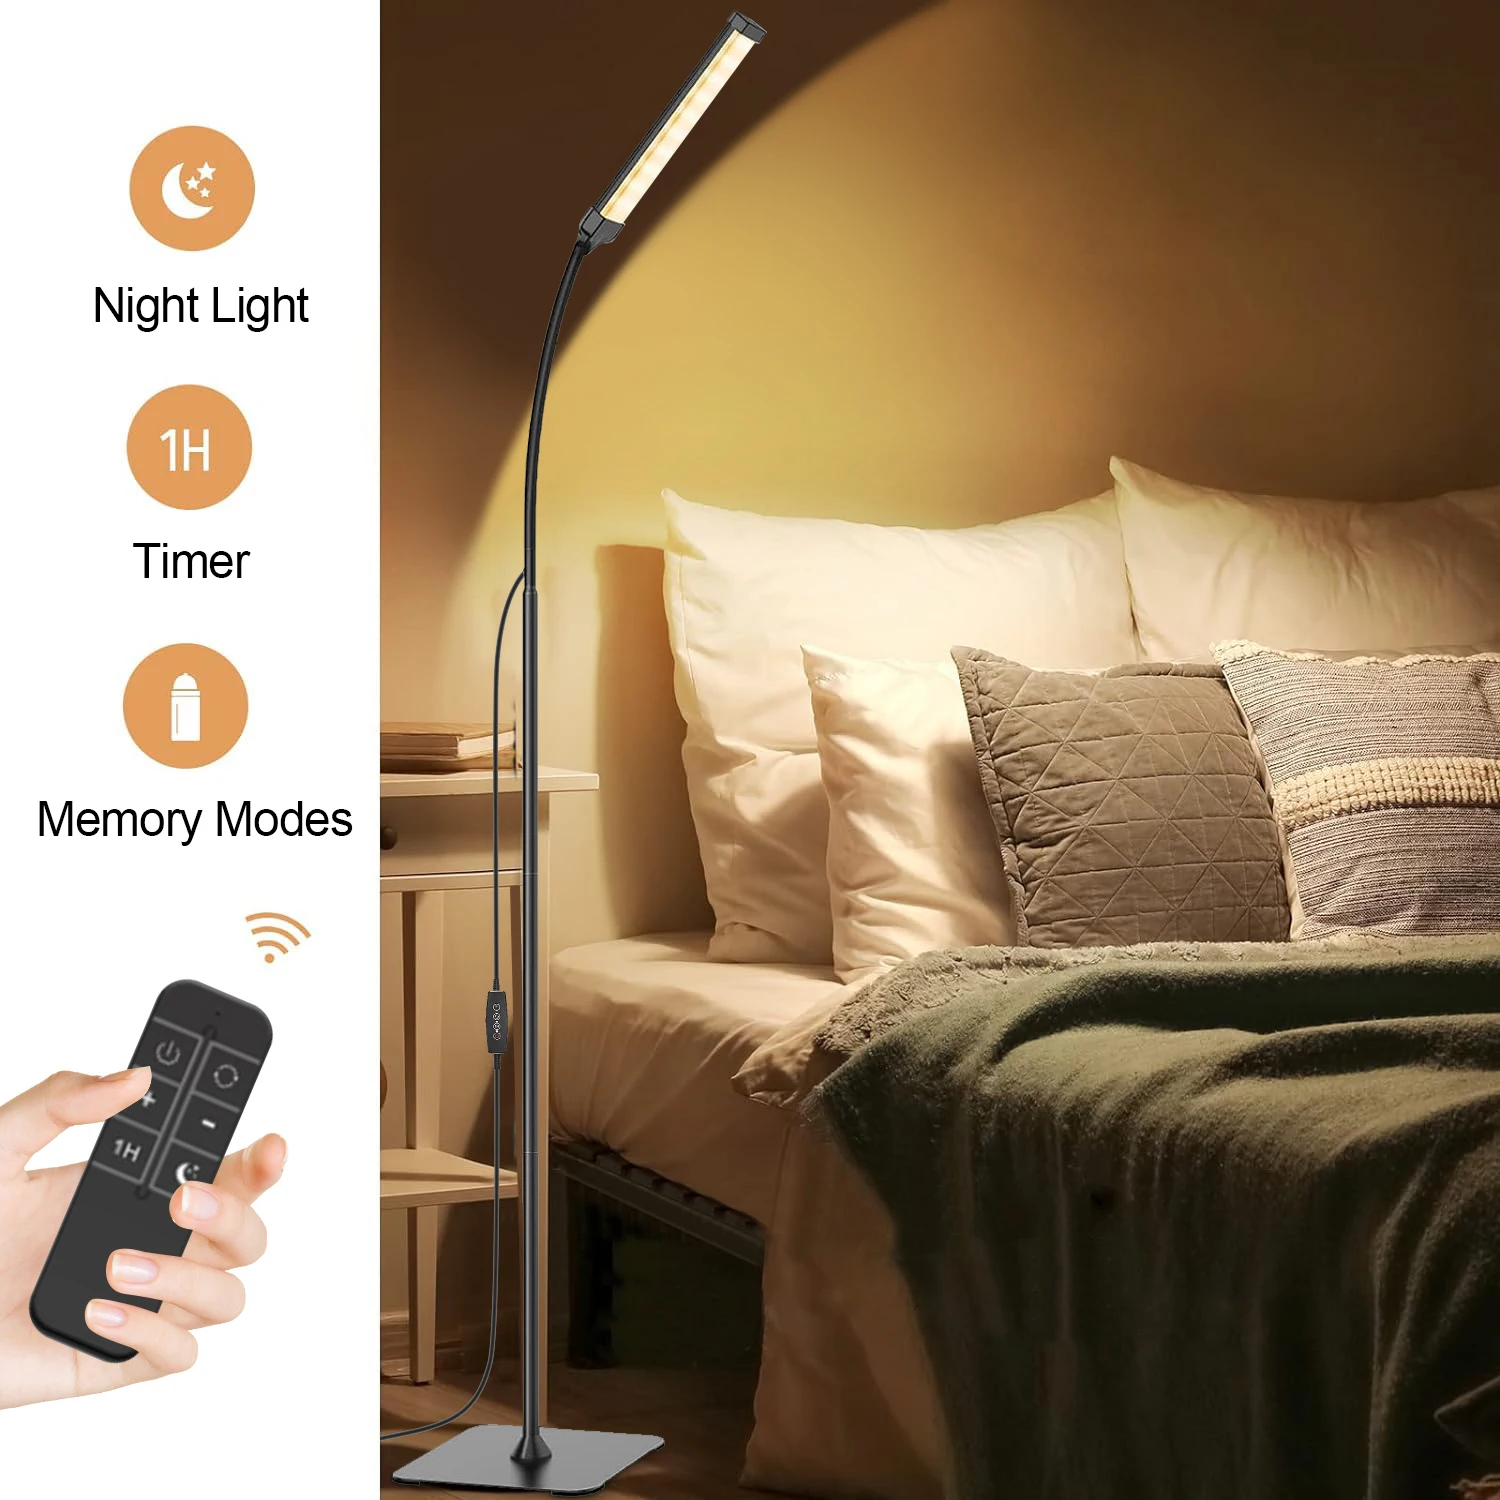
Dimmable arc floor lamps have additional electrical components that require careful testing through their full range of brightness settings.
Post-Assembly Care and Protection
Proper Positioning and Placement to Prevent Tipping
Once assembled, proper placement ensures your floor lamp remains stable:
- Place on flat, level surfaces
- Keep at least 6 inches (15 cm) from walls for arc lamps
- Position cord to prevent tripping or pulling
- Consider furniture placement to prevent accidental bumps
- For homes with children or pets, position behind other furniture when possible
- For uneven floors, consider non-marring furniture levelers
Understanding whether arc floor lamps are good for your specific space helps determine optimal placement for both stability and function.
Cleaning Techniques That Protect Different Lamp Materials
Proper cleaning maintains your lamp’s appearance without risking damage:
For metal finishes:
– Use a soft, lint-free cloth for dusting
– Dampen cloth slightly with water for stubborn dirt
– Avoid chemical cleaners on plated or specialized finishes
– Dry immediately after any wet cleaning
For fabric shades:
– Use a vacuum with soft brush attachment on low power
– Spot clean only according to fabric type
– Never saturate with cleaning solutions
For glass components:
– Use microfiber cloths to avoid scratching
– Clean with glass cleaner applied to cloth, not directly to glass
Brass arc floor lamps require specific care to maintain their finish. Avoid harsh chemicals and use only cleaners designed for brass surfaces.
Supplemental Information: Advanced Considerations
Can Floor Lamps Be Safely Disassembled for Moving?
Most quality floor lamps can be disassembled for moving or storage:
- Follow assembly instructions in reverse order
- Take photos before disassembly to aid in reassembly
- Store small parts in labeled bags
- Keep all parts together with the original manual if possible
- Wrap finished surfaces in bubble wrap or soft cloth
- Store shades separately in original packaging if available
Many best arc lamps for living rooms are designed with disassembly in mind, making them easier to move without damage.
What Materials Are Most Prone to Damage During Assembly?
Understanding material vulnerabilities helps prevent damage:
- Glass components: Most fragile, subject to chipping and cracking
- Thin metal finishes: Easily scratched (especially gold, chrome)
- Threaded connections: Vulnerable to cross-threading
- Fabric shades: Subject to tearing or staining
- Adjustable mechanisms: Can break if forced
Gold arc floor lamps feature particularly delicate finishes that can show fingerprints and scratches more readily than other materials.
How Do Different Floor Lamp Designs Require Different Assembly Approaches?
Lamp design significantly impacts assembly techniques:
Arc lamps: Require careful balance consideration and often have counterweighted bases that must be properly secured.
Multi-joint lamps: Need gradual tightening of all joints to maintain proper alignment.
Traditional pole lamps: Focus on vertical alignment throughout assembly.
Multi-light lamps: Require attention to wiring routing to prevent pinching or stress.
The complete arc floor lamp guide provides detailed information on the unique assembly considerations for different lamp styles.
By following these careful assembly techniques, your floor lamp will not only look its best but will also function properly for years to come. Taking your time during assembly is the most important factor in preventing damage to your new lighting fixture.